
Types of Knots for Jewelry Making: The Ones I’d Actually Learn First
These 13 knots give you a good base for jewelry making. Some are simple. Some feel a little more like outdoor knots or macramé knots. Still useful, though, once you scale them down and choose the right cord.
Will you use all 12 every week?
Probably not.
I don’t.
For most jewelry projects, I come back to the overhand knot, square knot, surgeon’s knot, lark’s head knot, sliding knot, and half hitch. Those are the ones that feel useful again and again. The others are still good to know, especially if you like cord jewelry, adjustable closures, or pieces where the knot becomes part of the design.
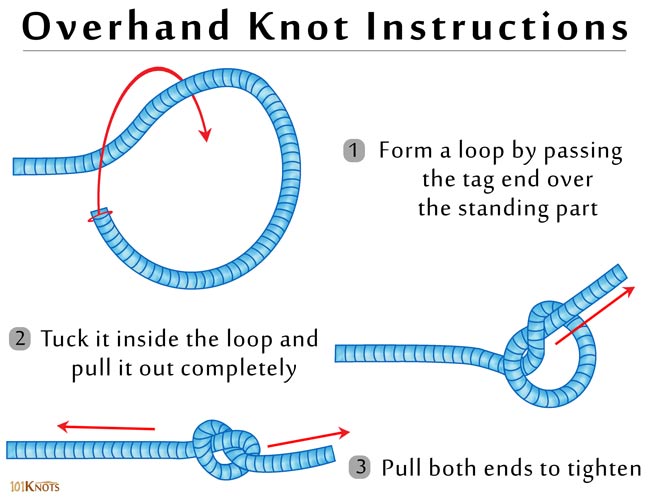
1. Overhand Knot

The overhand knot is the one most of us already know, even if we never learned the name.
Very basic. Still useful.
How to tie it:
Make a loop with the cord. Pass the end through the loop. Pull it tight.
Where I’d use it:
I use it as a quick stopper while stringing beads.
If I’m working with tiny glass beads and I’m not ready to add the clasp yet, I’ll tie an overhand knot at the end. Otherwise I know exactly what will happen. I’ll pick up the cord, tilt it slightly, and half the beads will slide off.
It also works for charm strands, keychains, and simple beading samples.
My note:
Don’t pull too hard on thin thread. You can weaken it or make the knot impossible to adjust.
If I need a little more hold, I’ll add a tiny dot of clear jewelry glue or clear nail polish.
Tiny dot.
Too much glue can dry into a hard little bump, and you may feel that against your skin.
2. Slip Knot
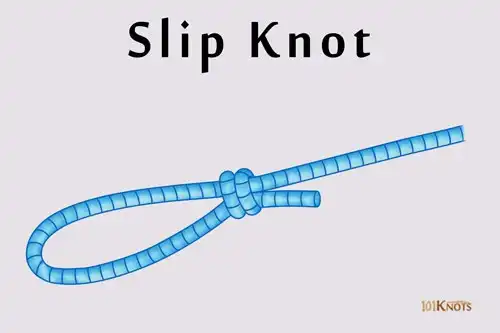
A slip knot gives you a loop that can tighten and loosen.
It’s one of those knots that feels more useful once you start making adjustable bracelets.
How to tie it:
Make a loop. Pull part of the cord through that loop to create a second loop. Slide it to tighten or loosen.
Where I’d use it:
Casual cord bracelets. Friendship bracelets. Practice pieces where I’m still figuring out the fit.
If you’re making a bracelet for someone and you don’t know their wrist size, this gives you some room to work with before you add a more finished closure.
My note:
I’d practice with embroidery floss first. It’s cheap, soft, and easy to see. Once your hands get the movement, try waxed cord or nylon.
Nylon may slip more, so don’t judge your first attempt too harshly.
3. Figure-8 Knot
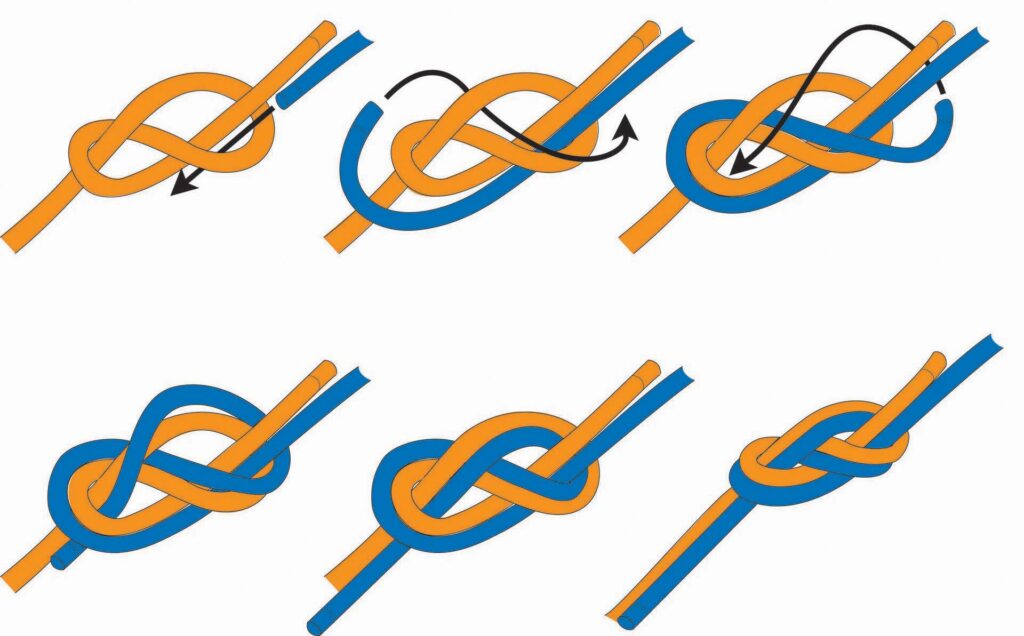
The figure-8 knot feels more secure than a simple overhand knot. It also looks better on thicker cord, at least to me.
A tiny overhand knot on leather cord can look a bit weak.
How to tie it:
Cross the cord into a figure-8 shape. Pass the end through the lower loop. Pull it tight.
Where I’d use it:
Near pendants. Near charms. On leather cord or thicker cotton cord.
For example, if you’re making a leather cord necklace with a small metal charm, a figure-8 knot near the pendant can help keep the charm in place without looking too delicate.
My note:
If it jams, don’t keep pulling. Slightly dampen the cord and loosen it slowly with your fingers.
Pulling harder usually makes it worse.
4. Sheet Bend

The sheet bend joins two cords, especially if they are different thicknesses.
It’s practical.
Pretty? Not always.
How to tie it:
Make a U-shape with the thicker cord. Wrap the thinner cord around it. Tuck the thinner cord under itself and pull tight.
Where I’d use it:
I’d use this when mixing materials, like waxed cord with thread or leather with cotton cord.
But I probably wouldn’t put it in the center of a necklace where everyone can see it. I’d hide it near a clasp, under a bead, or inside a wrapped section.
My note:
If the thinner cord is slippery, wrap it twice before tightening. One wrap may slip, especially with nylon.
5. Square Knot
The square knot, also called a reef knot, sits flat when you tie it correctly.
It looks simple. Then you look down and realize you accidentally tied it wrong.
Been there.
How to tie it:
Right over left. Then left over right. Pull both sides evenly.
Where I’d use it:
Simple joins. Macramé sections. Small decorative finishes.
It works best when both cords are close in thickness. On a leather cuff bracelet, a square knot near a toggle clasp can look clean and feel comfortable against the wrist.
Watch out:
If you tie it the same direction twice, you get a granny knot. That version usually twists and slips more easily.
If the knot looks crooked, I redo it.
I used to leave it and hope it would somehow look fine once finished. It usually didn’t.
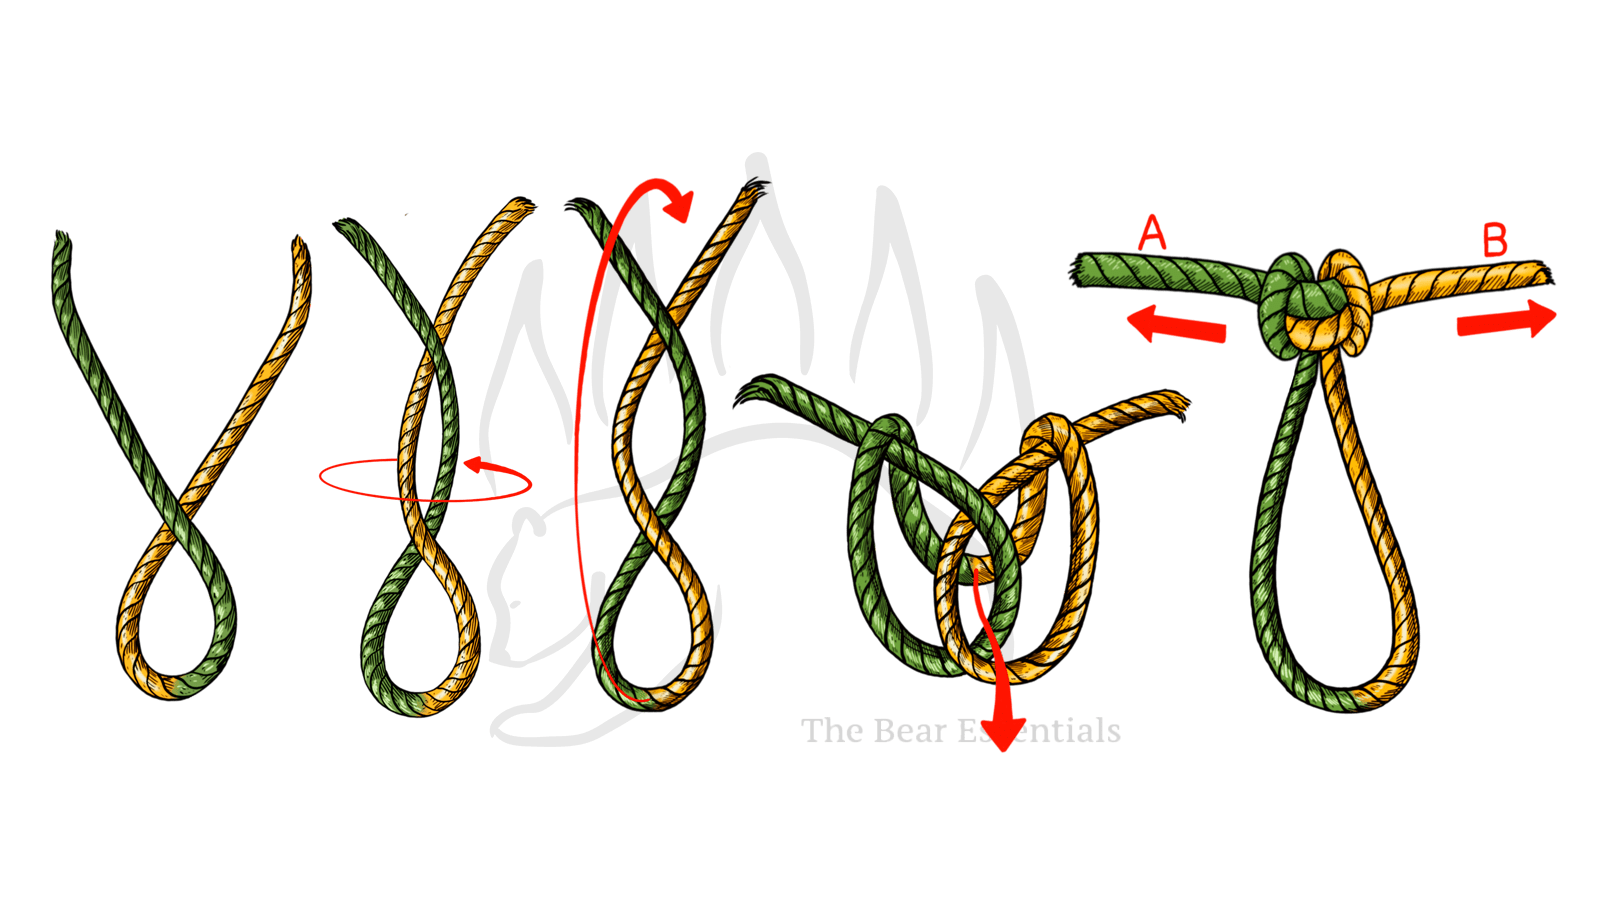
6. Double Fisherman’s Knot
The double fisherman’s knot is strong and more permanent.
Once it’s tight, it does not really want to come undone. Good if you tied it well. Very annoying if you didn’t.
How to tie it:
Wrap each cord end twice around the other cord. Pull both knots tight, then slide them together.
Where I’d use it:
Cord necklaces. Heavier bead pieces. Bracelet loops that get pulled often.
If I were making a necklace with heavier beads, I might use this near the closure, then hide the bulk inside a larger bead or crimp cover.
My note:
This knot can get chunky. Test it with the actual beads before finishing.
Sometimes a knot looks fine on the table. Then you put the necklace on and feel a little lump near the back of your neck.
No thanks.
7. Half Hitch
The half hitch is a quick anchor knot.
It wraps around something and holds the cord in place. Simple, but I use it more than I expected.
How to tie it:
Loop the cord around the object. Pass the end over the standing cord and through the loop. Pull snug.
Where I’d use it:
Beads. Rings. Wrapped stones.
For a wrap bracelet, you can tie one after every bead, or after every few beads, to keep the spacing from moving around too much.
My note:
One half hitch may not be enough on a smooth surface. I usually stack two. If the piece needs to handle regular wear, I may add a small amount of glue.
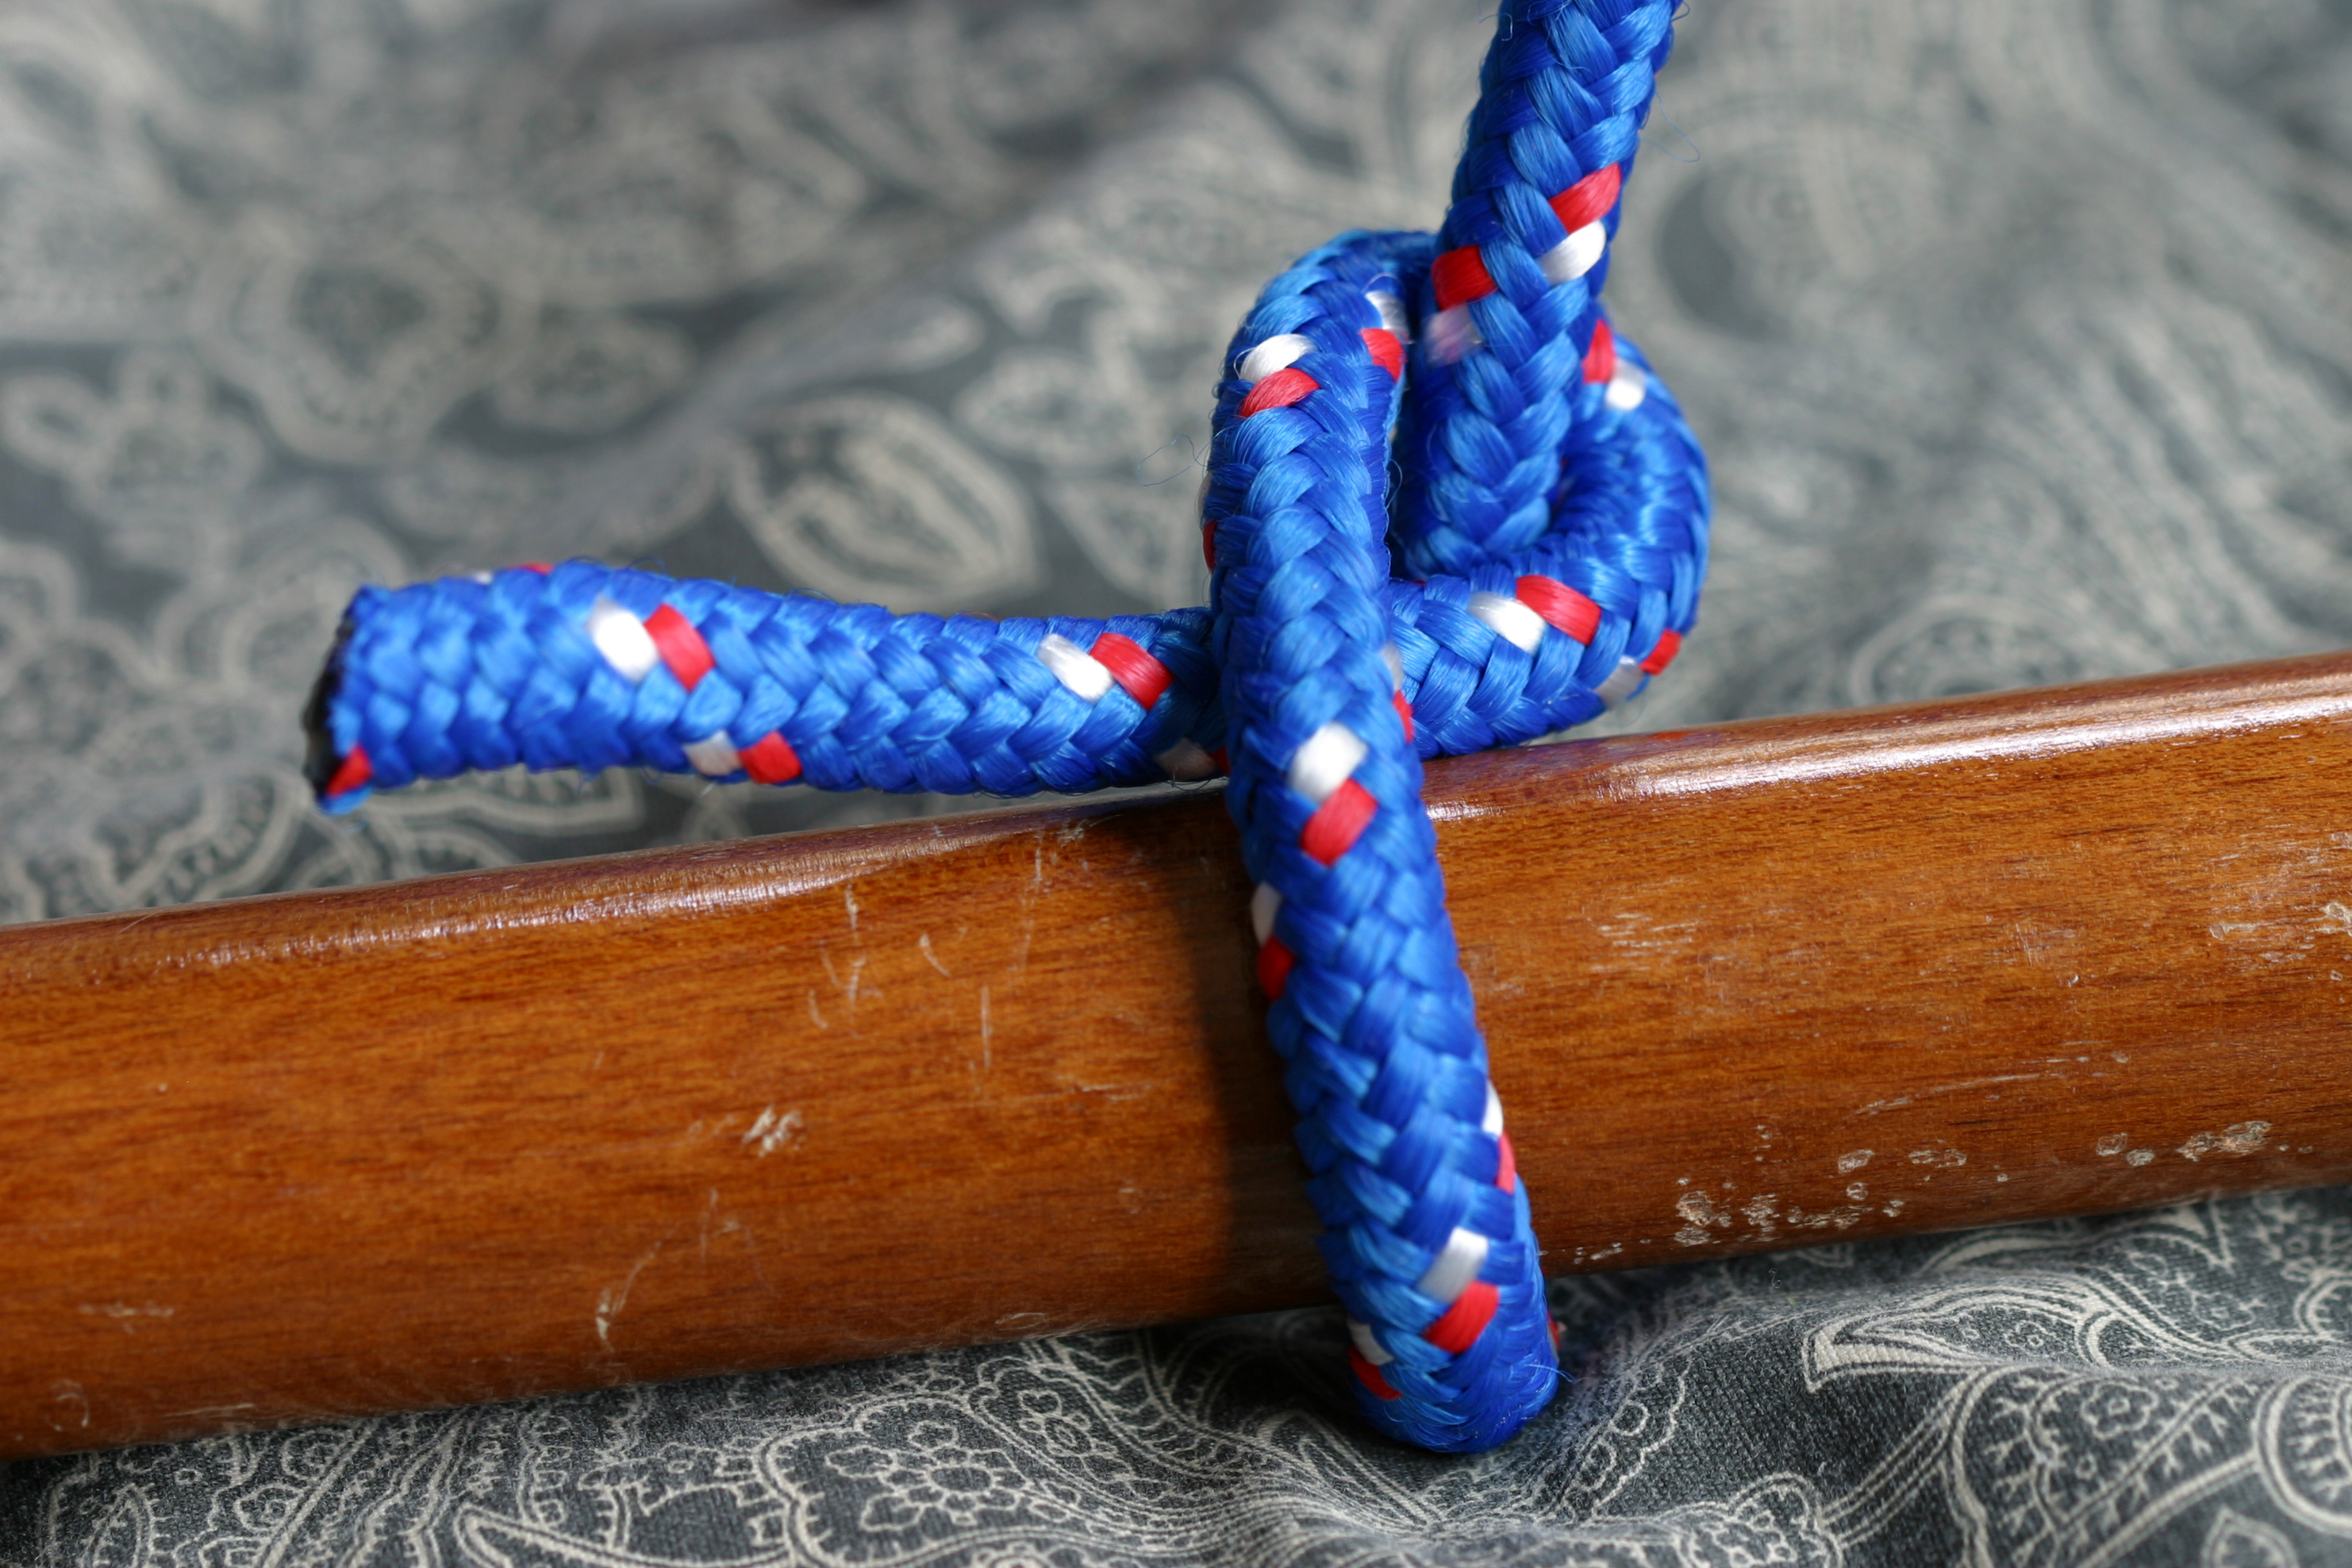
8. Clove Hitch

The clove hitch helps you attach cord to a ring, hoop, dowel, or clasp.
I would learn it on something bigger first. A pencil works.
A tiny jump ring is not the place to start.
How to tie it:
Wrap the cord around the object twice, crossing the cord as you go. Tuck the end under the final cross and tighten.
Where I’d use it:
Starting hoop earrings with cord. Attaching thread to a metal ring. Beginning a macramé-style pendant.
My note:
The clove hitch can loosen if it is not under tension. If the finished piece will move around a lot, secure the end with another knot or a small dot of glue.
9. Taut-Line Hitch

The taut-line hitch slides when you adjust it, then holds when there is tension.
This one is useful when you want the piece to move a little, but not too much.
How to tie it:
Wrap the cord twice around the standing line. Finish with a half hitch in the opposite direction. Tighten and test the slide.
Where I’d use it:
Adjustable chokers. Cord necklaces. Pieces where the length needs to change.
A pendant necklace might sit higher with a tank top, then lower over a sweater. A sliding setup makes that easier without adding a metal clasp.
My note:
Test it before trimming.
Slide it back and forth at least 10 times. If it feels too loose or too tight, retie it.
It is much less annoying to fix it now than after you cut the ends.
10. Bowline
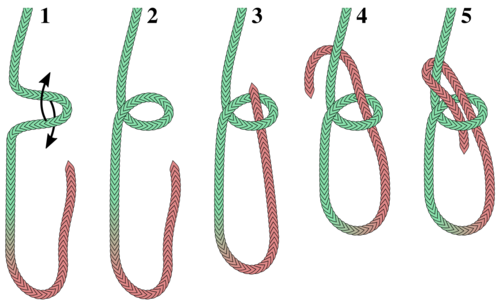
The bowline creates a fixed loop that does not slip easily.
It’s used outside jewelry a lot, but it can work with thicker cord.
How to tie it:
Make a small loop. Pass the end up through the loop, around the standing cord, and back down through the loop. Pull tight.
Where I’d use it:
Pendant loops. Charm loops. Nautical-style bracelets.
I wouldn’t use it on very delicate jewelry. It can look too large. But with cotton rope, leather cord, or chunkier designs, it can make sense.
My note:
The old memory trick still helps: the rabbit comes out of the hole, goes around the tree, and goes back into the hole.
Silly, yes.
Useful, also yes.
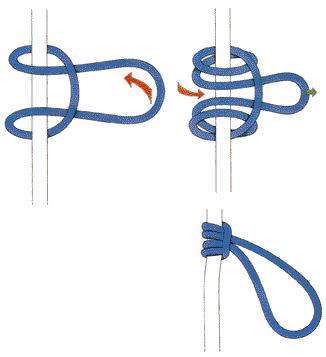
11. Alpine Butterfly
The alpine butterfly creates a loop in the middle of a cord without cutting it.
This one takes a bit more patience.
How to tie it:
Twist the cord twice. Pull the middle loop through the twists. Tighten slowly until the loop sits cleanly.
Where I’d use it:
Adding a charm to the center of a necklace. Organizing a multi-strand design before adding beads.
If you want one center charm on a cord necklace but don’t want to cut the cord, this knot gives you a loop right where you need it.
My note:
Learn it on thicker cord first. Thin jewelry cord can make it feel more confusing than it needs to be.
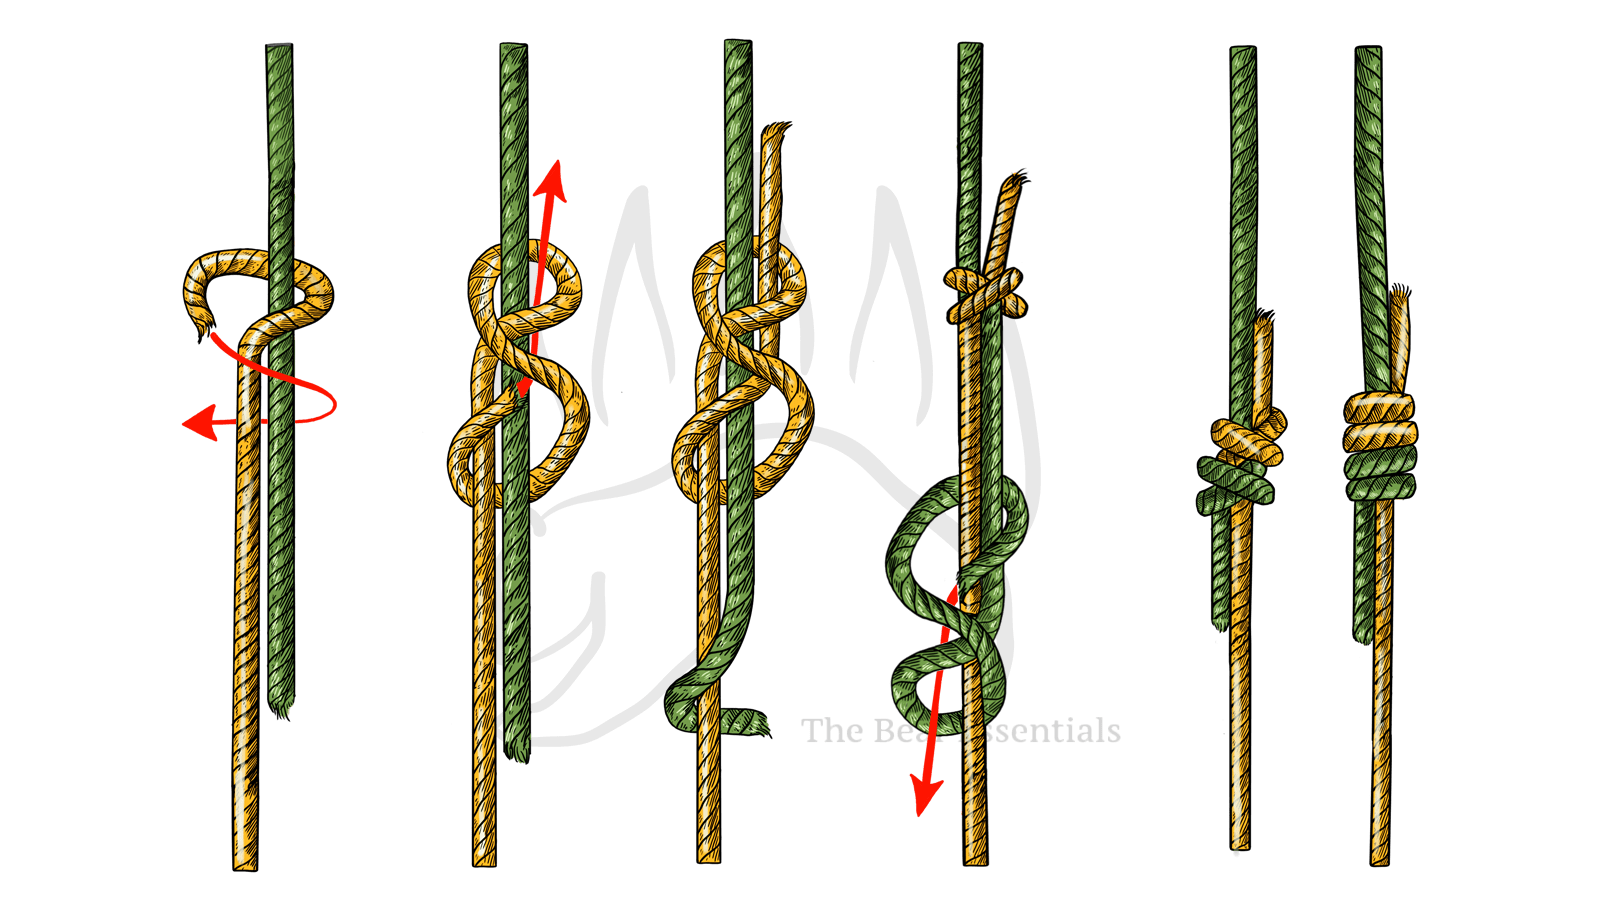
12. Prusik Knot
The Prusik knot grips another cord but can move when you loosen the tension.
At first, it feels a little strange. Then it starts to make sense.
How to tie it:
Wrap a small loop of cord around the main cord three times. Pass the ends through the loop and pull evenly.
Where I’d use it:
Adjustable sliders on bracelets or necklaces, especially when I don’t want metal hardware.
My note:
Use a slightly thinner cord for the wrapping cord. If both cords are thick, the knot may look heavy and feel uncomfortable.
13. Scrap Cord
I wouldn’t test a new knot on a piece I care about.
Use spare cord first. Even better, use the same type of cord you plan to use for the finished piece. A knot that behaves nicely on waxed cotton may act completely different on stretch cord.
I’d try:
- Waxed cotton cord
- Embroidery floss
- Stretch cord
- Leather cord
- Nylon thread
- Hemp cord
Waxed cord usually grips well. Stretch cord can be a pain. It slips, stretches, and sometimes snaps if you pull too hard. Leather looks good, but it gets bulky quickly. Silk thread feels beautiful, but if your tension is uneven, it shows.
One thing I always do now is that I pull the finished knot a few times before trimming the ends.
Not a dramatic pull. Just the kind of pressure the piece might get when you put it on or take it off.
If the knot loosens on the table, it will probably loosen on your wrist.
Related video
The Functional Knots I Come Back To
When I’m making jewelry someone might actually wear, I care about function first.
A knot has to survive normal life.
Pulling a bracelet over your hand. Taking a necklace off too fast. Getting the cord caught on a sweater. Dropping the piece into a bag. All the ordinary stuff.
The knots I come back to most are:
- Surgeon’s knot
- Square knot
- Lark’s head knot
- Sliding knot
- Double overhand knot
- Half hitch
- Overhand knot
They are not fancy. Fine by me.
They work.
Knots for Clasps
Clasps need knots that stay tight and sit neatly near the hardware.
I usually want the knot to be small, flat, and easy to hide. If it sits near the back of the neck or inside the wrist, comfort matters too.
Surgeon’s Knot
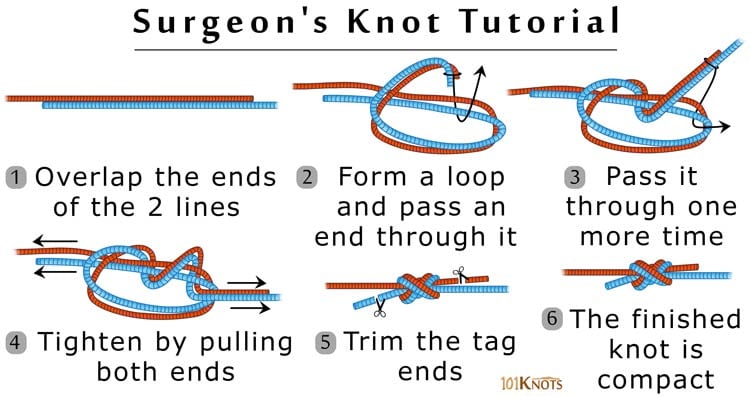
The surgeon’s knot is one of my favorites for stretch cord, silk thread, and slippery materials.
It is close to a square knot, but the extra wrap gives it more grip.
How to tie it:
Cross the right cord over the left. Wrap it around twice. Pull gently. Then cross the left cord over the right once and pull tight.
Where I use it:
Elastic bead bracelets. Silk thread near clasps. Gemstone bracelets where I want the knot to feel more secure.
For a gemstone bracelet, thread both cord ends through the clasp ring. Tie the surgeon’s knot close to the ring. Trim the ends, but don’t cut right against the knot. I like leaving a tiny tail.
Before finishing:
I pre-stretch the cord. A few gentle pulls. Stretch cord often loosens after wear, so I’d rather deal with that before tying the final knot.
Then I add a small dab of jewelry glue. Let it dry for at least 10 minutes, or follow your glue instructions. For stretch bracelets, I’d let it cure overnight.
Common mistake:
Pulling one side harder than the other.
The knot turns lopsided. The cord may wear unevenly. It also just looks a bit wrong.
I still practice this one on scrap cord when I’m using a material I haven’t used before.
Square Knot for Clasps

The square knot works well when both cords are the same thickness.
It lies flat, which makes it more comfortable near a clasp.
Where I use it:
For a leather cuff bracelet, I’d pass the cord through a toggle bar, tie a square knot near the hardware, and pull both sides evenly.
I’d also use it for simple cord bracelets with wood beads or ceramic beads, especially if the knot is meant to be seen.
My honest note:
I wouldn’t rely on a plain square knot on slippery elastic.
It can loosen with repeated stretching. If I have to use it, I add glue.
Knots for Pendants
Pendants are fussy.
If the knot sits a little off, the pendant may tilt. If the cord twists, it may flip. If the loop is too large, the pendant slides around more than you want.
So I test pendant knots in the mirror before I trim anything.
Lark’s Head Knot
The lark’s head knot is one of the easiest ways to attach a pendant to cord.
How to tie it:
Fold the cord in half. Push the folded loop through the pendant hole. Pull the two loose ends through the loop. Tighten downward.
Where I use it:
Crystal pendants. Shell pendants. Simple metal charms. Casual cord necklaces.
I like it when I want to change pendants without cutting the cord.
Small test:
Try passing the loop through from the back instead of the front. It changes how the cord sits.
I’d test both ways before deciding. Sometimes the difference is small. Sometimes one side looks much better.
Sliding Knot for Adjustable Necklaces
 A sliding knot lets you change the necklace length.
Very useful if you wear the same necklace with different necklines.
How to tie it:
Overlap the two cord ends. Use one cord end to tie an overhand knot around the other standing cord. Repeat on the other side. The two knots should slide along the cord.
Where I use it:
Chokers. Cord necklaces. Simple pendant pieces without metal clasps.
A small stone pendant on black cord can sit higher with a white shirt, then lower over a sweater. I like that. It makes one necklace easier to wear.
My note:
Cotton, hemp, and waxed cord usually grip better than smooth nylon. If the knots slide too easily, the necklace may loosen while you wear it.
Overhand Loop
 The overhand loop creates a small loop near the end of a cord.
Simple. Useful. But I’d be a little careful with it.
How to tie it:
Make a loop near the cord end. Pass the tail through like a regular overhand knot. Size the loop before tightening. Pull it snug.
Where I use it:
Lightweight pendants. Charm drops. Simple bead dangles.
For heavier pendants, I’d choose something stronger or test it carefully first. On smooth thread, this knot can feel less secure than I’d like.
Related video
Knots for Stretch Cord
Stretch cord is convenient.
Also annoying.
It slips. It stretches. It can snap if you pull too hard. And because bracelets stretch every time you put them on, a weak knot gets exposed fast.
For stretch bracelets, I usually reach for a surgeon’s knot or a double overhand knot.
Surgeon’s Knot for Stretch Bracelets
After stringing the beads, overlap the cord ends by a few inches. Tie a surgeon’s knot. Pull the knot tight slowly. Add a tiny dot of glue.
If the beads have large enough holes, tuck the knot inside one bead. It looks cleaner.
For a wooden bead bracelet or small gemstone bracelet, the surgeon’s knot usually handles repeated stretching better than a single overhand knot.
Before trimming, I pull the finished bracelet gently several times.
If the knot holds, I feel better about wearing it.
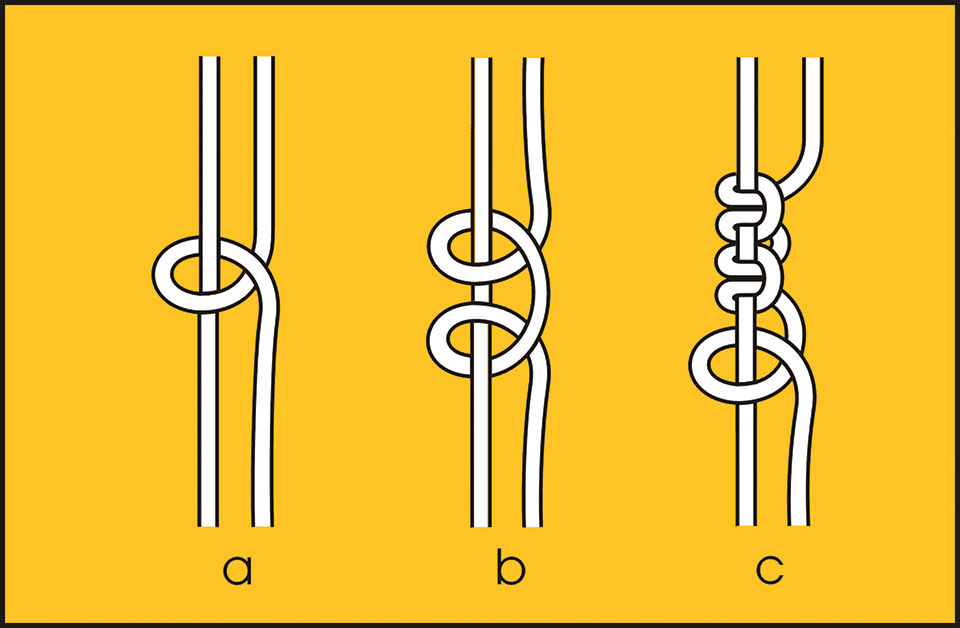
Double Overhand Knot
The double overhand knot is a thicker version of the basic overhand knot.
How to tie it:
Make a loop. Pass the end through twice. Pull both ends until the knot tightens.
Where I use it:
Kids’ bead bracelets. Pony bead bracelets. Casual stretch pieces where a simple finish is enough.
It is harder to undo, so check your bead pattern first.
My note:
Glue can help on slippery elastic. Use less than you think. Too much glue dries into a hard lump, and that lump can rub against your skin.
Half Hitch and Overhand Knots for Beading
These two knots are basic.
I still use them all the time.
They are the kind of knots you forget to talk about because they feel too obvious. Then you realize they quietly save half your projects.
Half Hitch
A half hitch helps secure thread around a bead, ring, or cord.
In a wrap bracelet, I’d tie two half hitches after a bead to keep it in place. In bead weaving, I’d use small half hitches between beads to secure thread without adding much bulk.
Pull each hitch snug before adding the next one.
Loose hitches shift. Then your spacing starts to look messy.
Overhand Knot
The overhand knot works as a stopper.
I tie one at the start of a beading project so beads don’t slide off. I also use it between larger beads when I want a knotted look.
On a casual pearl-style necklace, knots between beads can help reduce rubbing. They also keep every bead from falling off at once if the cord breaks.
A small thing. But useful.
Decorative Knots for When the Knot Is the Design
Decorative knots are different.
They are meant to be seen.
I’d use them when the cord is part of the style, especially in macramé bracelets, pendant necklaces, cord earrings, and handmade accessories.
These take more patience. In my experience, the hard part is usually tension. One side gets pulled too tight, the other side stays loose, and suddenly the knot looks off.
Normal.
Retie it.
Josephine Knot
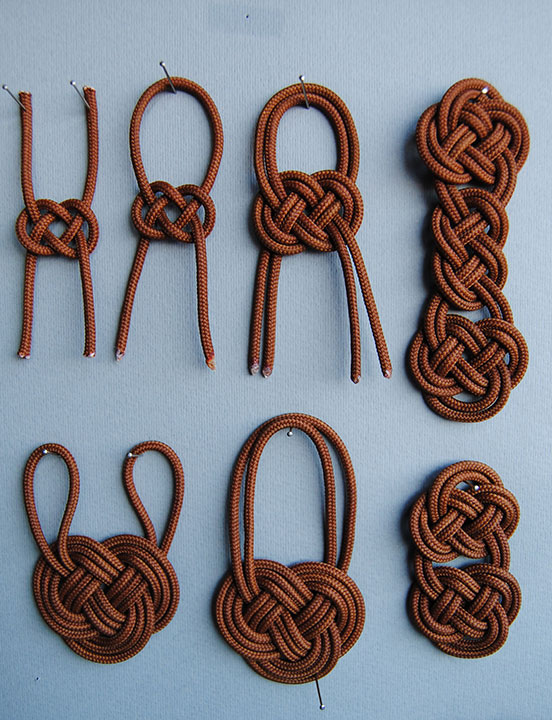
The Josephine knot, also called the double coin knot, creates a flat rounded shape.
It can look soft and pretty with thin cord.
How to tie it:
Place two cords side by side. Make a loose loop with one cord. Weave the other cord through the loop in an over-under pattern. Pull both sides slowly until the knot becomes even.
Where I use it:
Cord earrings. Pendant drops. A bracelet center detail.
For example, a thin silk cord Josephine knot can sit nicely under a small pearl or metal bead. It gives the piece detail without adding another charm.
My note:
Use non-stretch cord while learning. Waxed cotton works well because it holds shape better.
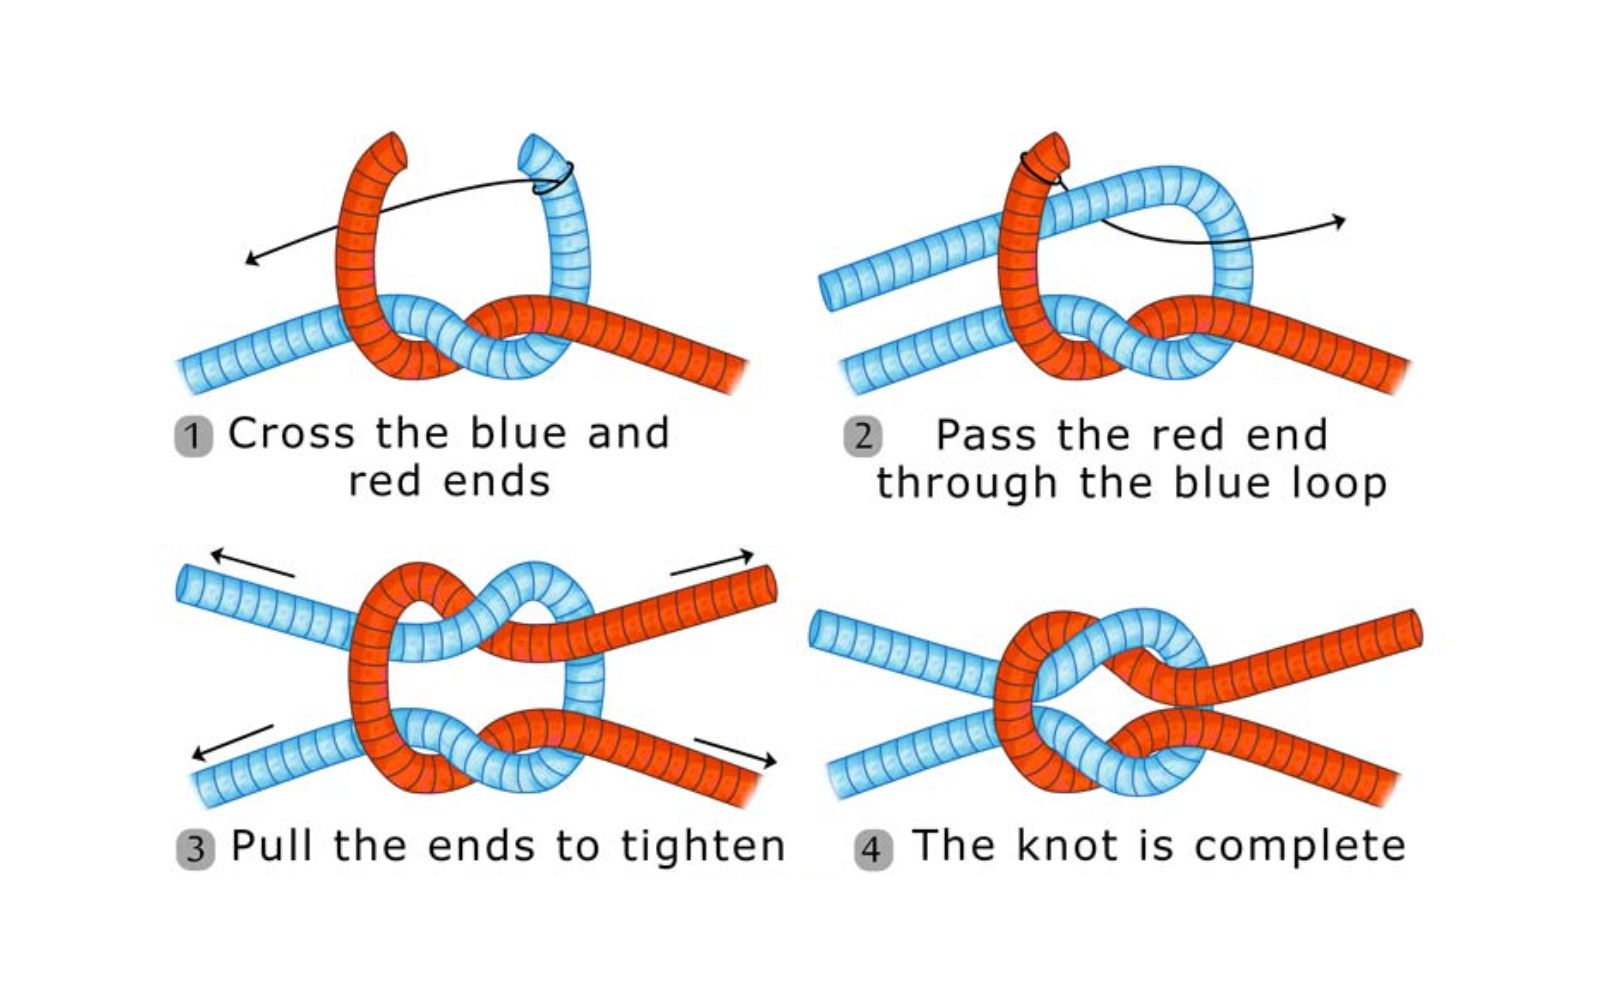
Pretzel Knot
The pretzel knot, also called a carrick bend, creates an interlaced shape.
This one needs even tension.
How to tie it:
Make a loop with one cord. Weave the second cord through it in an under-over pattern. Pull slowly and shape the knot as it tightens.
Where I use it:
Friendship bracelets. Boho-style wrap bracelets. Thicker cord designs.
Practice it larger first. Use two colors of cord so you can see where each strand goes. Once the movement makes sense, try it with thinner jewelry cord.
My note:
If you pull one cord too hard, the knot twists. When that happens, I loosen it and shape it again instead of forcing it flat.
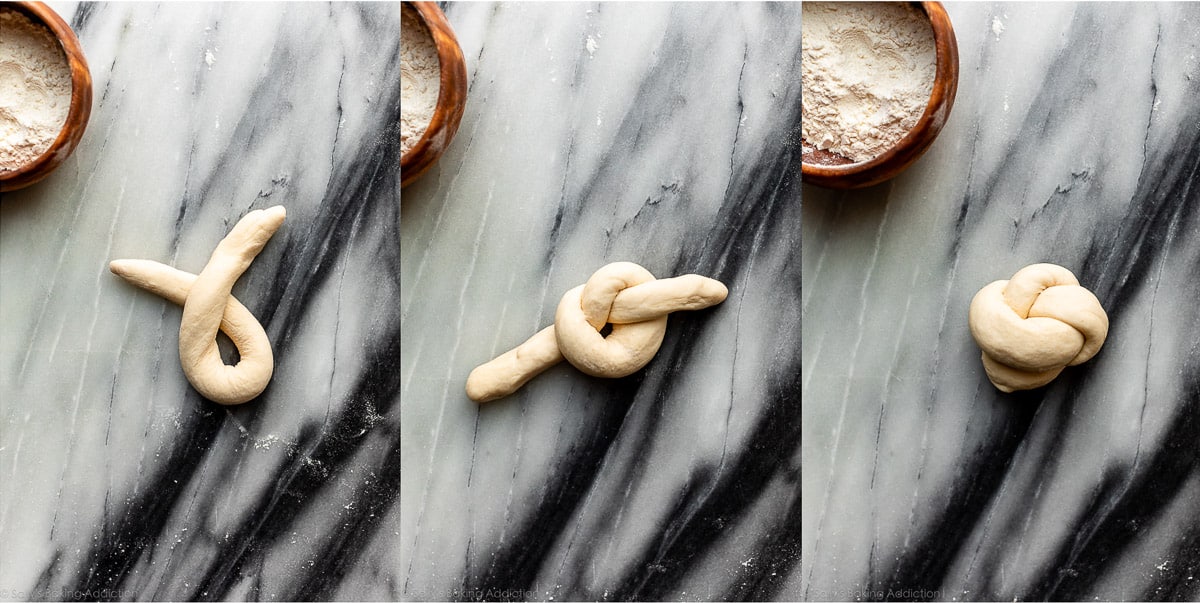
Button Knot

The button knot creates a small rounded knot.
It can work as a closure or a decorative end.
How to tie it:
Make a loose loop. Wrap the end around your finger, a dowel, or the cord several times. Pass the end through the center. Tighten slowly into a rounded shape.
Where I use it:
I like it as a closure for a cord bracelet. It can pass through a loop on the other side, almost like a handmade toggle.
It also works as a bead substitute on a simple cord necklace.
My note:
Tighten slowly. If you rush, the knot can collapse into a strange lump.
With thicker cord, pliers can help pull the end through.
Snake Knot

The snake knot creates a repeated coiled pattern.
Once your hands understand the movement, it has a nice rhythm.
How to tie it:
Use two cords. Loop one side over the other, then alternate sides as you build the pattern. Pull each section snug before moving on.
Where I use it:
Leather bracelets. Cord necklaces. Keychain-style jewelry accessories.
For a bracelet, you can make the whole band from snake knots and finish it with a button knot closure.
My note:
Two cord colors make the pattern easier to follow. Once you understand the movement, single-color cord looks cleaner.
Turk’s Head Knot

The Turk’s head knot creates a braided ring shape.
I’d treat this as a practice knot first.
Wrap it around a mandrel, marker, or small tube. Learn the path. Then try scaling it down.
I’d use it as a cuff accent, a ring-style cord detail, or a decorative section on a thicker bracelet.
Not my first knot for a beginner piece. But fun once you’re comfortable with tension.
Celtic Knot
Celtic-style knots can work for pendants, earrings, and statement cord pieces.
They need careful shaping. If the loops are uneven, the whole piece looks unfinished.
I’d use this when the knot is the main feature. Maybe a cord pendant with a small bead below it. Or earrings where the knot creates the shape.
Don’t start with thin slippery cord.
Really.
Use thicker cotton cord first, then move smaller once your hands know what to do.
Which Knot Feels Most Secure for Jewelry?
If I had to choose one knot for everyday jewelry, I’d probably choose the surgeon’s knot.
It’s easy to learn. It works well on stretch cord. It gives more grip than a basic square knot.
Still, I test it every time.
Material changes everything.
For permanent joins, I’d use a double fisherman’s knot.
For adjustable necklaces, sliding knots.
For pendants, I usually start with a lark’s head knot.
For decorative cord work, I’d practice Josephine knots and snake knots first.
Here’s my test: tie the knot, then pull it 20 times with the same kind of pressure it might get during wear.
If it slips, redo it.
If it frays the cord, change the material or choose another knot.
If it holds and still feels comfortable, you’re probably fine.
What Is the “King of All Knots”?
The bowline is often called the “king of knots” because it creates a fixed loop that holds well and is still fairly easy to untie.
In jewelry, I wouldn’t use it everywhere.
It can look too large on delicate pieces. But for thicker cord necklaces, nautical-style bracelets, or pendant loops, it can work.
If you’re making a bracelet with an anchor charm or rope-style cord, the bowline makes sense.
A Quick Note on the Windsor Knot
You may also hear about the Windsor knot because it is used for neckties. Donald Trump is often associated with a large Windsor-style tie knot.
For jewelry making, I’d treat this more as design inspiration than a standard jewelry knot.
A bold triangular knot could work for a structured cord piece, a masculine bracelet, a cufflink-style accessory, or a tie-inspired necklace detail.
But for most beginner jewelry projects, I’d spend more time on surgeon’s knots, sliding knots, square knots, and lark’s head knots.
You’ll probably use those much more.
My Simple Knot Practice Plan
If I were starting again, I’d practice in this order:
- Overhand knot
- Square knot
- Surgeon’s knot
- Lark’s head knot
- Sliding knot
- Half hitch
- Double fisherman’s knot
- Josephine knot
- Snake knot
Make 5 versions of each knot.
Pull them. Trim them. Add glue to one version and leave one without glue. Check them the next day.
It’s a small test, but it tells you a lot.
You’ll see which knots slip. Which ones get bulky. Which cords are pleasant to work with, and which ones make you question your patience.
For me, that’s when knots started to make sense. Not from memorizing the names. More from seeing what happened when I actually used them.
Infographic


Leave a comment